Showing posts with label Recipe. Show all posts

Monday, February 16

Valentines Cookies

Our Valentines Day traditions are always the same.

...avoid people and crowds.

so "LOVE"-ly right?
but seriously, from the very beginning when Garrison and I were celebrating our one month anniversary on valentines day, we just wanted to be homebodies and keep it simple. Chinese take out, a movie, and falling asleep early are our only traditions.

we kept with that same tradition this year and enjoyed some take out from Rice King on center in provo, and watched a very non-romantic movie "Get On Up" because it was the only one left in the redbox, pulled out the hide-a-bed and i fell asleep in-between contractions halfway through the show. Bayli stayed home with us, as finding a babysitter is just as difficult as finding a table in the nicest restaurant on V-Day.

a few days prior to Valentines day Bayli and I decided to make cookies because along with our semi-lame traditions, I figured making cookies with the kids would be simple enough to keep up through the years.

our all time favorite recipe for sugar cookies is below, as well as a link to my favorite icing, and some adorable pictures of Bayli and cookie dough. yeah. enjoy!

Soft Sugar Cookie Recipe
-2 Cups Sugar
-3 Eggs
-1 Cup Milk
-1 Cup Shortening
-5 Cups Flour
-3 tsp Baking Powder
-1 tsp Salt
-1 tsp Almond Extract

cream shortening and sugar. add eggs and beat until fluffy. add milk and almond extract, blend. mix in dry ingredients and blend until mixed, it will be sticky. roll out on heavily floured counter. roll until about 1/4"-1/2" think depending on preference, and how many cookies you want to make. cut into desired shapes using floured cookie cutters, place on cookie sheet and bake for 8-10 minutes at 375 degrees. cool, and either frost, or ice. our favorite icing recipe/technique is here. (except, we prefer the taste of dark karo syrup, unless your wanting the color of the icing to be a pastel or white, then you need to use light karo syrup.)


Monday, March 25

ONE

Bayli is one.
i have to find some way of breaking my habit of calling her a baby and use the word toddler instead. even though it still has a weird taste in my mouth when i say it. this has been the most surreal and wonderful year. i really cannot believe that its already over.
i have spent the past few weeks stressing about moving into my parents basement, and completely moving out of our old house. my fingers are still recovering from all the cleaning. not to mention all the organizing and cram-packing of our storage unit.
but, the entire time i was moving i just thinking about how sad it was that we wouldn't be able to share our childs first birthday in the same house that we first brought her home to from the hospital. i still remember that week, her tiny newborn body with wandering eyes and flailing limbs. that faint smell of sweet milk on her breath and the way that those wandering eyes could focus for just a moment on your eyes and it felt like she was staring into your soul. garrison and i talked about how much fun we would have watching her walk under our beautiful blossoming trees. sadly enough, the day we finally left the house and said our final goodbyes, those buds we had been day dreaming about were just starting to sprout.
anyway, enough sappy missing-my-old-house-ness but in order for me to shove those sad thoughts out of my head while moving, i decided to divert all my attention to planning one awesome first birthday for my little girl... we may or may not have gone overboard.

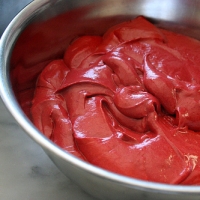
que lots of colorful pictures of my happy little girl and her sprinkle birthday cake.


p.s. the cake was made from a box of white cake mix. boring, but... the frosting was amazing! it is unique to make but it doesn't taste as dense or as sugary as most frostings i have had before and so i really enjoyed it. i often get sugar headaches from eating frosting but with this i just couldn't get enough! (and my guest's couldn't either)

here is the recipe. i got it from an antique cook book called "make-a-mix cookery" by Karine Eliason, Nevada Harward & Madeline Westover

Rainbow Cake Frosting
1 cup milk
2 tablespoons flour
pinch of salt
1/2 cup butter -room temperature-
1/2 cup shortening -room temperature-
1 1/2 - 2 cups granulated sugar

in a small saucepan, combine milk, flour, and salt with a whisk. cook over medium heat about 5-7 minutes stirring frequently, until thickened. cool. combine butter, shortening and sugar in a medium bowl. beat well. add to cooled milk mixture (it should look like pudding) beating constantly. beat about 7 minutes, until smooth. divide mixture among 4 bowls. add your different flavoring and food dye to those bowls. frost like usual.

suggested flavorings
option 1: "sprinkes" lemon (white), coconut (blue), almond (green), and cherry (red).
option 2: "spumoni" -should be used with a chocolate cake- almond (green), lemon (yellow) peppermint (red), chocolate (3 tbsp cocoa and 1/4 tsp vanilla).


Monday, August 27

for the love of chocolate milk

my husband always asks me to get him a gallon of chocolate milk from the store.

i usually don't get him any...

i figure, we have chocolate syrup, or chocolate powder so that he can make his own. but he insists that pre-made chocolate milk is better.

last week i actually bought him a gallon of chocolate milk.

...BEST THING EVER.

we have gone chocolate milk crazy over here! i'm almost ready to go get another gallon. but, one of the things that i've tried to do with the chocolate milk is use it in recipes. the whole concept started when i made some instant chocolate pudding awhile back and just wished that it was more chocolate-y, more rich, just... more. so, i wondered what it would be like if it was made with chocolate milk instead. that just got the ball rolling. then we thought, what about vanilla pudding made with chocolate milk, what about chocolate cake made with chocolate milk, what about cookies made with chocolate milk, etc, etc.


well, i can tell you that so far every item we've made has been so much better made with chocolate milk!!!

the chocolate pudding tastes like fudge pudding, the vanilla pudding tastes like red velvet pudding/cake (especially after adding a bit of red food coloring) and the cake was just so much more flavorful. even if i didn't use chocolate milk in any of my recipies, i would have to continue buying it just because we enjoy drinking it so much, but... after realizing that i can use it while cooking... i'm pretty sure it will have to be a staple in our grocery list right along with eggs and cheese.


sometimes... those random ideas in your head actually turn out to be delicious!

Wednesday, July 18

Magleby's Chocolate Cake Recipe


coming from someone who worked there for a few years... I LOVE THIS CAKE. like, craved it when i was pregnant and i would gladly stuff a pillow under my shirt today, claim to be pregnant and craving it again just so that could get some without feeling guilty.

well, because i used to work there, i admit i feel totally awkward walking back into the restaurant just because the owner scares me just a little. maybe intimidates me is a better word. but... what about my cake cravings??? i did have my friends get it for me. or my husband. and sometimes i would bite my pride and just get one anyway. and heaven bless the girls at the salon that would get some and share it with all the stylists in the break room. oh and not to mention the weddings that have this cake. i totally was that girl sneaking away with more than my fair share. but... the time finally came for me to just make it. here's the recipe:


Magleby's Chocolate Cake Recipe:

1 Cup butter
1 Cup water --boiling
5 T. heaping cocoa
2 Cups flour
2 Cups sugar
½ t. salt
2 Eggs, lightly beaten
1 t. soda -- dissolved in little water
1 t. vanilla
½ Cup sour cream

mix in butter, water and cocoa together, then add dry ingredients, mix the eggs, soda and vanilla in separate bowl and add to mixture. lastly, gently mix in the sour cream. do not over mix.
bake in two 8" or 9" round cake pans (buttered and floured) for 50 minutes at 325 degrees. 
remove from pans, chill (Magleby's freezes theirs) cut off the edges, and frost.


as far as the frosting goes... i do not have the recipe but... i just used one container of the milk chocolate frosting from the store with 1 cube butter, 2 cups powdered sugar, 1 t. vanilla and 1/3 cup milk mixed in. -i do this because the chocolate flavoring is too overpowering to enjoy the taste of the cake, to lighten/fluff it up, and to make more!-leftover frosting is always welcomed in my house- the frosting tastes very similar to me!

about technically frosting the cake. i know i did a terrible job in the above picture but... i'm not a professional chef. and i was under a time crunch. i do remember starring for what seemed like hours at the cake decorator while working in the mornings while it was slow. seriously, that girl had it down! and sometimes, she would even let me have the crusty part they cut off -honestly my favorite part of the cake... seriously, when i left, the floor manager made me a huge bowl of these cut up pieces of crust and another bowl of frosting that i dipped them in as a going away present... the best!- i could tell you stories for hours about my employment there: crazy things doc said/did, phone calls, proposals, after hour clean ups and more but... honestly. the best thing about that shop is this darn cake. and the rolls. yeah, those too.

Friday, June 15

DIY: Making Your Own Pesto

 My favorite fast-ish food restaurant is Noodles & Co, and one of my favorite dishes there is the Pesto Cavatappi. It's delish. well, after getting married i realized that i couldn't afford to get that meal as often as i would like, so, i made my own! {that recipe coming soon} but, the most intimidating part was the pesto. until, i actually made some. so much easier than i thought! basically you need these things:


basil
olive oil
Parmesan cheese
pine nuts
garlic
pepper
salt


add them together in a blender or food processor. and your done.


depending on your own flavor preferences, the amounts of each item will vary. you just want to make sure that there is the most basil. here's a rough idea of what i do for mine.
1/2 cup basil, 1/4 cup pine nuts and 1/4 cup Parmesan cheese, 1 to 2 heaping tablespoon of garlic, salt and pepper to taste and 4 tablespoons of olive oil.
blend until the texture looks about right, if it looks too dry then add more olive oil. too wet... more basil. taste, and use in your next meal. {i like to freeze at least half of it}


Monday, June 11

This one takes the cake


honestly, i'm not one of those awesome chef's out in the world. my mother makes some amazing stuff and i've tried to make her proud through the years by repeating her recipes almost as good as her. well... i decided instead of using one of my mothers old recipes i would branch out and try something new. well as i was thinking and searching the internet for something yummy, two things stood out to me. Cream Cheese. & Nutella. normally these two would not go together but i decided that they should. the reason: im not a fan of lots of chocolate, but, Nutella adds just the right amount of flavor without being overpowering. so, i've created my own concoction that turned out to be absolutely delicious and beautiful if i might say so myself. here's the scoop.

Cream Cheese Pound Cake Recipe:

1 1/2 cups butter, softened at room temp
1 (8-ounce) package cream cheese, softened at room temp
3 cups sugar
6 large eggs
3 cups all-purpose flour
1/8 teaspoon salt
1 tablespoon vanilla extract

mix together in electric mixer slowly and one by one in that order. pour into either two round cake pans or a bundt pan (Grease and flour the pans) cook at 300 degrees for about 1:40 minutes. note: it makes your house smell amazing for the entire two hours. :)

Recipe with step by step picture tutorial also found here 

after that's done, let them cool and cut in half so that you can put this amazing mouse between the layers. some might say to just put the two entire circle cakes on top of each other but no... this cake is extremely dense and rich, you don't need two cakes on top of each other. one is enough. promise. 

Mouse Recipe:

1 cup whipping cream
1/4 cup nutella

whip together until you can form peaks with your beaters. the end.

then make this Frosting:
2 cubes of room temperature butter (1 cup)
2 cups powdered sugar
1 tbsp vanilla
milk

whip the butter and powdered sugar together (it will be lumpy) add the vanilla (this will make it a little less lumpy and might splatter all over your kitchen, so add slowly) then add milk until it's the right consistency for your taste. this way, instead of adding more and more sugar like most frosting recipes call for, you are adding more milk... it turns out less rich and potently sugary. much more edible in my taste. if you would like it super fluffy then instead of adding all the milk, just add a tub of cool whip. (don't forget to pick a super awesome color and dye it! or... white's fine too.)

add them all together and what do you get?


all i did to make the hearts, letters, and elephant was take chocolate chips (white chocolate if you plan on dying it), melt them in a small ziplock bag by placing it in a bowl filled with hot water from the faucet (the same way you would heat a bag of frozen breast milk) then add dye and smush around (if necessary) then draw your item on a piece of paper, place a large ziplock bag on top of the paper. cut a -smaller-than-you-think hole in the corner of the chocolate bag and pipe the chocolate by tracing the drawing on top of the ziplock bag. or just freehand. let cool (an hour or so depending on the thickness of your item) carefully remove from top of ziplock bag and place on cake. so simple.


hint: if your doing a large figure like the elephant, then make sure to do your piping thick enough that it wont break when taking it off the ziplock after it dries. also, i made the elephant look like it had 1 inch "stilts" underneath it's legs so that i could stick those stilts deep into the frosting. that way it would look like the elephant was just barely standing on the frosting but still have some foundation. 
you can kinda see the "stilts" in this image

Friday, May 18

Nachooooo

Best Nachos EVER!!!

I currently weigh a healthy 165, I know a little heavy:) However, that may soon change. Valeri makes the best NACHOOOOOOS ever. And we eat them in bed (notice the sheets). They will go straight to my hips!  

All I know is they are delicious. Nachos are simple right? WRONG! I just grab some junk mix it with cheese strap it on the top of some chips and throw it in the microwave. Mine never turn out great. Valeri's on the other hand are delectable. Thanks Baby!

Monday, April 23

Chocolate chip cookies

Chocolate Chip Cookies

1 1/2 cups shortening
1 cup and 4 Tablespoons brown sugar
1 cup and 4 Tablespoons sugar
3 eggs
1 1/2 tsp vanilla
3/4 tsp water
3 cups and 6 Tablespoons flour
1 1/2 tsp baking soda
1 1/2 tsp baking powder
1 1/2 tsp salt
1 cup chocolate chips

Directions
cream shortening and sugars together


add eggs and beat until fluffy


add water and vanilla


mix in dry ingredients and blend together. add more flour until dough just starts to pull cleanly off the sides of the mixer. add more water if not sticky enough.


fold in chocolate chips


spoon onto un-greased cookie sheet and bake for 7-10 minutes at 370 degrees (or until you start to see tan on the tops)


quickly and carefully remove off cookie sheet and cool, or eat immediately with a glass of milk.


side note: the weird measurements are because the recipe was created for Utah's altitude... random fact. Also, if you don't like chocolate chips, and instead prefer white chocolate chip macadamia cookies, replace 1 cup chocolate chips, with 1/2 cup macadamia nut (slightly chopped), 1/2 cup white chocolate chips.

Saturday, April 7

Easter Egg Nests


Easter No Bake Chocolate Peanut Butter Birds Nests

Ingredients

  • 2 cups sugar
  • 4 tablespoons cocoa
  • 1 stick butter
  • 1/2 cup milk
  • 1 cup peanut butter
  • 1 tablespoon vanilla
  • 3 1/2 cups oatmeal
  • Waxed paper
  • 1 bag Cadbury Mini Eggs

Directions

In a heavy saucepan bring to a boil, the sugar, cocoa, butter and milk. Let boil for 1 minute then add peanut butter, vanilla and oatmeal. On a sheet of waxed paper, drop mixture by the spoonfuls, immediately make indent in the center until it looks like a nest, let sit until cooled and hardened.

I doubled this recipe and made the nests for my family for Easter this year. For the eggs I used Cadbury mini eggs because they simply are the best, but you could use any form of eggs or jelly beans. I guess now that im a mom I get to make cute little holiday themed things like this on a regular basis. Boy am I excited. :)

We used the smaller nests for our sunday school class that we teach. it's our first week as their new teachers and we are very excited!

a big thank you to my two cooking assistants:

Sunday, April 1

General Conference Weekend


ours consisted of baby staring and banana chocolate chip pancakes. 

Banana Chocolate Chip Pancake Recipe:
  • 1 1/2 cups flour
  • tablespoon sugar
  • teaspoons baking powder
  • 1/2 teaspoon cinnamon
  • 3/4 cup milk
  • 2 mashed bananas
  • 1 egg, lighty beaten
  • teaspoon vanilla
  • 1/2 cup chocolate chips, divided

Directions:

  1. 1
    Combine flour, sugar, baking powder and cinnamon in a large bowl.
  2. 2
    After mixing well stir in milk, banana, egg and vanilla.
  3. 3
    Fold in 1/4 cup chocolate chips.
  4. 4
    Heat a griddle, sprayed with oil on medium heat. Pour batter onto griddle making 3 inch rounds.
  5. 5
    Cook about two minutes or until tops are bubbly. Flip pancake and cook for another minute or until golden.
  6. 6
    sprinkle with remaining chocolate chips and serve with butter and syrup.


it was also a wonderful weekend because we were able to hear the prophet, his apostles and other general authorities of the LDS church speak. it was wonderful to have my little newborn baby in my arms as they talked about the importance of families and the proper way to raise children. i love this gospel and it's teachings and cannot express enough gratitude for all the ways it has blessed me in my life. if you would like to read one of my favorite talks from this weekend click here.

Wednesday, December 7

Carmel

So... Technically it might be called dulce de leche but to me, its like milky carmel.
Via pinterest I found this tip to make carmel from sweetened condensed milk. All it said to do was submerge your can in water and in the crockpot and cook on low for 6 hours or overnight. The end. There were also tips to line your crock pot with foil or place can on a saucer to avoid rust marks, and... To take the paper off of the can. But seriously how simple is that??
Well, after buying apples and grapes at the store this week i decided to give this tip a try. After putting the can in yesterday morning, removing it when I got home from work about 7 hours later, letting it cool while we were at a party, when we got home boy what a fun surprise. Carmel was waiting for us. Needless to say our apples are already gone.

We have another party to go to tonight and we were asked to bring a small desert. Well, I'm considering this a desert. After picking up a few more supplies at the store, here is my recipe for my carmel fruit dip I made for tonight.

Carmel Fruit Dip
1 jar of marshmallow creme
1/2 can of carmel (or whatever you havent eaten yet)
1/2 box of cream cheese
1/2 tub of cool whip.
Fruit: Apples and grapes are the best for dipping

I love pinterest and all the little tips and tricks that make something as daunting as homemade carmel easy as pie.

Published with Blogger-droid v1.6.8

Tuesday, November 29

Homemade Hot Chocolate

as a christmas tradition, we make this while decorating the tree: mom's famous hot chocolate!

1 can evaporated milk
2 cans of water
3/4 cup sugar
1 heaping Tbsp cocoa powder
1 tsp vanilla
heat up milk and water in saucepan, do not boil. mix sugar and cocoa in seperate bowl, add in about 1-2 tbsp of heated milk/water mixture to make a cocoa paste and pour into saucepan. heat till desired temperature, add vanilla and serve. (non fat free -or fat included?- milk is best to use)

Wednesday, November 2

Roasted Pumpkin Seeds

After carving our pumpkins this year we decided tonight to turn the insides into roasted pumpkin seeds. we took way tooooo many pictures and had way too much fun documenting this, so, enjoy the process, literally step. by. step.

first thing you do is carve your pumpkins as mentioned in this post. then you separate the seeds from the gunk and stringy stuff. we did that earlier with two of our best friends Kevin and Jyrl and so, this is a bag that we stored the seeds in from all four of our pumpkins. and turn on the oven so it can pre-heat to 400 degrees
rinse your seeds, unless you really really like the pumpkin flavor
in a saucepan put in about 2 cups of water and 1/2 tbs salt for every 1/2 cup of seeds you have. (or more salt if you like them extra salty like us)
bring to a boil and add your rinsed seeds. simmer for 10 minutes.
drain, do not rinse
prepare pan by pouring about 1 tbs olive oil (we did two pans since we had 4 pumpkins worth of seeds)
dump seeds onto pan(s)
place in oven on top rack and bake for 20 minutes rotating them with a metal spatula at halfway (10 minutes)
remove from oven and let chill before you eat -unless you can handle the heat-
place them on your super cute $1.50 cake stand made from This Post and enjoy! eat by cracking them like a sunflower seed -like me-, or eat the whole thing -like garrison- both are completely acceptable. if you would like to try other seasonings, first of all, google it, cause there are millions of different spice combinations from sweet and savory to spicy and salty.
be prepared to buy pumpkins just for the seeds next time, or possibly tomorrow, because they will go that fast! enjoy! and... 
Keep up with us Jones'